Set up Ghost With Mailgun on Synology Nas

Ghost is an open-source blog website software, which helps manage blog posts conviniently and easily. This website is also powered by Ghost.
Mailgun is a email delivery platform usually used with Ghost to enable sending and recieving emails to subscribers.
I used to hold my own ghost website on Google's server, but since I used a free plan the performance was not ideal. Recently, I built my own nas and transform the whole website onto it. In this blog, I want to share the process to set up Ghost with Mailgun on your own synology nas.
Using Docker on synology, which is Container Manager, is a super efficient way to deploy Ghost.
- Create a
dockerfolder if you donot have one. In this folder create another folderghostto store the data of the website we are going to build. Then, build the rest folders based on the following structure.
volume1	/
├── docker/
│   ├── ghost/
│   │   ├── volumes/
│   │   │   ├── ghost-data/
│ │ │ └── mysql-data/- Get your own domain, and put it onto Cloudflare by adding record.
(Google it if you have no idea on this) - Go to Mailgun and register an account. Add your domain to it, and follow the steps to add Sending records and Recieving records to Cloudflare.
Once your domain is verified, ycreate a new SMTP user to send out bulk emails (eg. postmaster@yourdomain.com). We will be using the username and password below.
(Note: Mailgun provides free plan, do not forget to downgrade to it if you donot want to pay!) - Create a
compose.yamlfile with the following content:
version: '3.1'
services:
  ghost:
    image: ghost:5-alpine
    restart: always
    depends_on:
      - db
    ports:
      - 8061:2368
    environment:
      database__client: mysql
      database__connection__host: db
      database__connection__user: root
      database__connection__password: [set a password here]
      database__connection__database: ghost
      mail__transport: SMTP
      mail__options__host: smtp.mailgun.org
      mail__options__port: 587
      mail__options__service: Mailgun
      mail__options__secure: false
      mail__options__requireTLS: true
      mail__options__secureConnection: false
      mail__options__auth__user: [Mailgun SMTP username]
      mail__options__auth__pass: [Mailgun SMTP password]
      url: https://yourdomain.com
    volumes:
      - /volume1/docker/ghost/volumes/ghost-data:/var/lib/ghost/content
  db:
    image: mysql:8.0
    restart: always
    environment:
      MYSQL_ROOT_PASSWORD: [the password u set above]
    volumes:
- /volume1/docker/ghost/volumes/mysql-data:/var/lib/mysql- Go to Project tab in Container Manager, add a project with a name and the .ymal file we created above, set the path to /docker/ghost. Then the ghost and mysql database containers should be automatically created and deployed.
The Ghost website is up now! After this we need to deal with proxy problem, otherwise people cannot visit the website via https.
- Follow the following article to set up Cloudflare reverse proxy:
https://www.ioiox.com/archives/105.html - Go to nas's
Control Panel/login portal/advanced, clickreverse proxy:
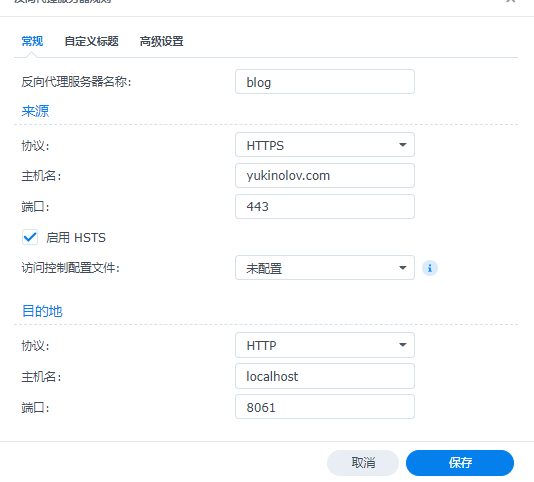
- Go back to Cloudflare, add a new record:
CNAME yukinolov.com ddns.yukinolov.com DNS only auto - Go to nas's
Control Panel/Safe access/licence.
Create a new licence from Let's Encrypt.
Enter your domain, email, and also your domain on the third space.
Do not forget to select the licence in the setting selection.
Now you can visit your Ghost blog website!
Use https://yourdomain.com/ghost to access to Ghost control panel.
Open up Settings/Email Newsletter/Mailgun Configuration. Enter your Mailgun Subdomain and Mailgun Private API key.
Now you can freely use your website!