Deploy Blossom Note on Synology Nas

Recently, I've been looking for open-source note taking application, and the design of Blossom is really appealing. In this blog post, I will do a quick guide on how to deloy Blossom on Synology NAS using yml file.
- DSM Version:7.21
- DDNS: using CloudFlare
- using Container Manager
What is Blossom Note
Blossom is a note-taking software which support self-hosted and cloud-based dual-chain storin. You can store your notes, images, and personal schedules on your own server and synchronize them in real-time across any device. It also functions as a dynamic blog.
It can running on Windows,Mac,web-based clients, and mobile web interfaces.
Learn more about Blossom on their GitHub page: Blossom
Create yml file
version: "3.8"

networks:
  blossomnet:
    driver: bridge

services:
  blossom:
    image: jasminexzzz/blossom:latest
    container_name: blossom-backend
    volumes:
      # NAS path
      - /volume1/docker/blossom/bl:/home/bl/
    environment:
      SPRING_DATASOURCE_URL: jdbc:mysql://blmysql:3306/blossom?useUnicode=true&characterEncoding=utf-8&allowPublicKeyRetrieval=true&allowMultiQueries=true&useSSL=false&&serverTimezone=GMT%2B8
      SPRING_DATASOURCE_USERNAME: root
      // use your own password
      SPRING_DATASOURCE_PASSWORD: xxxx
    # make sure the port is not in use
    ports:
      - "9999:9999"
    networks:
      - blossomnet
    healthcheck:
      test: ["CMD", "curl", "-f", "http://localhost:9999/sys/alive"]
      interval: 30s
      timeout: 10s
      retries: 3
      start_period: 5s
    restart: always
    depends_on:
      blmysql:
        condition: service_healthy

  blmysql:
    image: mysql:8.0.31
    container_name: blossom-mysql
    restart: on-failure:3
    volumes:
      - /volume1/docker/blossom/mysql/data:/var/lib/mysql
      - /volume1/docker/blossom/mysql/log:/var/log/mysql
      - /volume1/docker/blossom/mysql/mysql-files:/var/lib/mysql-files
    environment:
      MYSQL_DATABASE: blossom
      # use your own password
      MYSQL_ROOT_PASSWORD: xxxx
      LANG: C.UTF-8
      TZ: America/New_York
    # make sure the port is not in use
    ports:
      - "3306:3306"
    networks:
      - blossomnet
    healthcheck:
      # use the same password as MYSQL_ROOT_PASSWORD
      test: ["CMD", "mysqladmin", "-uroot", "-pyour_secure_password", "ping", "-h", "localhost"]
      interval: 10s
      timeout: 3s
      retries: 12
After creating the yml file, create some new folders:
volume1	/
├── docker/
│   ├── blossom/
│   │   ├── bl/
│   │   ├── mysql/
│   │       │── data/
│   │       │── log/
│   │       │── mysql-files/
│   │
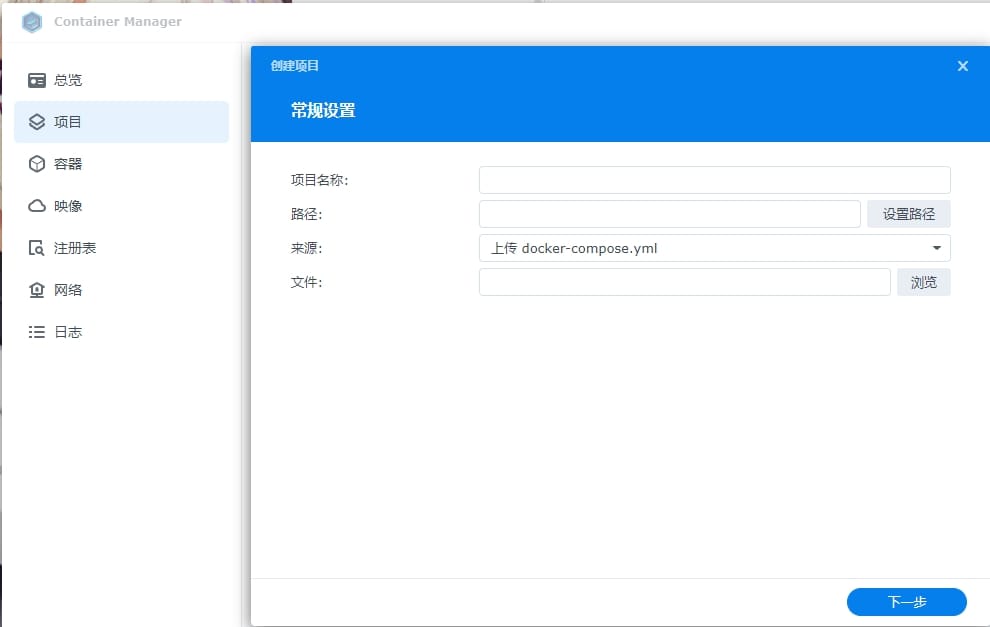
Then, go to Container Manager and create new project.

- name it
blossom - set the directory to
docker/blossom - update the yml file we just created
Now, the service should be running!
Using http://nas_ip:9999/editor/#/settingindex to access it.
Cofig DDNS
- Follow the following article to set up Cloudflare reverse proxy:
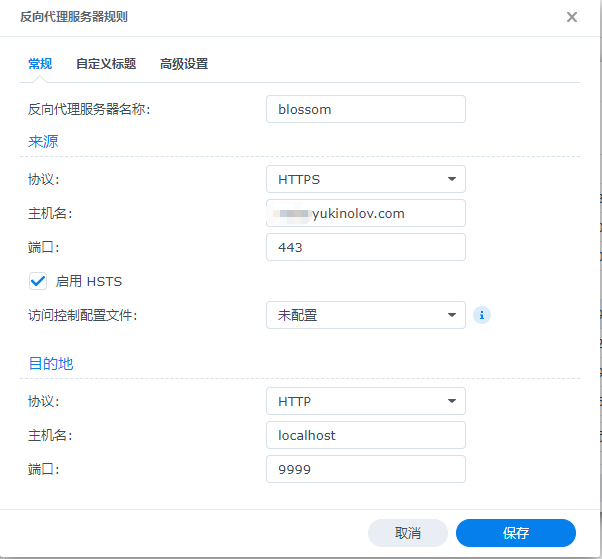
https://www.ioiox.com/archives/105.html - Go to nas's Control Panel/login portal/advanced ,click reverse proxy:

- Go to nas's Control Panel/Safe access/licence.
- Create a new licence from Let's Encrypt.
- Enter your domain, email, and also your domain on the third space.
- Do not forget to select the licence in the setting selection.
Now, you can use your domain to access it~
Some notes
- Follow the official document in GitHub for the setting
- Remember to set both
file access addressandblog access addressto localhost - In Editor or Picture, if you want to set a picture as the icon of a file or an article, using the https link of the picture. Using http links would lead to no picture showing up when accessing in WAN
- Use
http://nas:9999/blog/#/homein LAN orhttp://ur_domain/blog/#/hometo access the blog page. In this blog page, only your shared articles are visible.